 How to work in Wordpress
Interface
Homepage
When you log into Wordpress administration firstly you will see this page. Most important and useful things here are:
 1. My sites
2. All Posts
3. Categories
4. Comments
1. My sites – When you click on this tab you will see all Wordpress websites you have access too. Here you can switch between blogs in different languages.
2. All Posts – By clicking here you will get to the page with all articles that are in your blog.
3. Categories – All articles in blog can be added to one or more categories to simplify the navigation for the visitors. Here you can manage all categories.
4. Comments – If somebody comments in Disqus comment box, you’ll see notification there, and will access *managing comments for you blog*(link).
All Posts page
Click “All Posts” to get to the page with your articles.
 1. Add New
2. Filters
3. Search bar
4. Draft notice
1. Add New – Click “Add new” to start writing a new article.
2. Filters – Therere few ways to filter posts in Wordpress:
1) Stage of posting: all, published, drafts and trash (deleted ones)
2) Time: select the month that you need
3) Category: select one of the categories of the blog
3. Search bar – If you know the name of the article you’re searching for, you can directly put it there.
4. Draft notice – Articles that are not yet published have a mark “Draft”.
How to add and edit an article
Add New
When you want to write a new article click “Add new”, you will see the following interface:
 1. Enter title
2. Tool bar
3. Mode switch
4. Text field
5. Author
6. Excerpt
7. Screen options
8. Publish options
9. Categories
1. Enter title – Enter the name of your article here.
2. Tool bar – All tools that you will need to work with text, like with Microsoft Word are here. Find more about them *here*(link).
3. Mode switch – Switch between Visual presentation of the article and its *HTML version*(link).
4. Text field – Enter the text of your article here.
5. Author – Choose from a drop down list the person who initially wrote the article (not translated).
6. Excerpt– Write 1-2 sentences to summarize the article. This text will be displayed in users’ project page under the title.
7. Screen options – If you don’t see all the option displayed on this page, click “Screen options” in the above right corner and tick those you’re missing.
8. Publish options – In this box you can save, preview and publish the article, set the time of publishing, etc. Find out more about it *here*(link).
9. Categories – Tick the categories that suit this article.
Editing article
Link field

1. Title – You enter title of the article here. *How to pick a title*(link)
2. Link field – System forms a link for the title. *How to choose link* (link)
3. Edit – Button for editing link. If you change title later, copy the article’s new title, click edit and post it in link field.
4. View post – Click to see the article on website.
5. Get Shortlink – System will generate short link to the article looking like this: https://blog.webnode.com/?p=12345
Tool bar

Toolbar in article editing is pretty much like in Word. Let’s stop at some buttons that not everybody is familiar with.
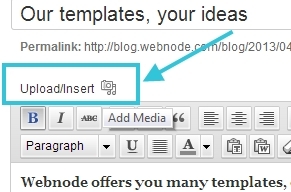
1. Upload/Insert – Inserting media files to the articles. Use it to add images. *How to post images and edit them* (link)
2. Quotes – Used at the end of the article to create grey buble.
3. Pasting options – use it when copying text from another source.
4. Link – Adding/deleting links *How to optimize links* (link)
5. Read more – Use after perex to hide the rest of the article with “Read more” message.
6. Full screen – This button hides all option on page leaving you just with text editing.
7. Show/hide 2nd line – If you don’t see 2 lines like on this screenshot, then you should click it to see the 2nd one.
8. Undo/redo – Making mistakes in not scary. Undo the last change like you normally do in Word.
Excerpt

The text you put into excerpt will be displayed when you want to share the link and also in our users’ project page.
Publishing and saving
While translating don't forget to save your work from time to time. Once you finished with editin the article you can simply click "Publish" on the write.
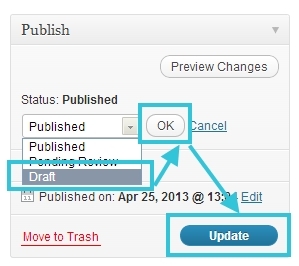
What to do if you accidently published the article and it shouldn't be on blog?
- Then click on the status of an article and instead of "Published" select "Draft"
- After that click OK and Update the article
Categories
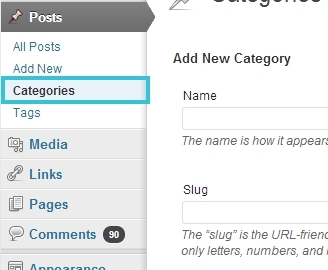
To manage the categories of your blog, open a submenu of "Posts" called "Categories".
On the new page there's form to fill for creating a new category. "Name" and "Slug" are enough. The parent category will be "None" - this way a category will be shown among others and won't become a subcategory of another one.
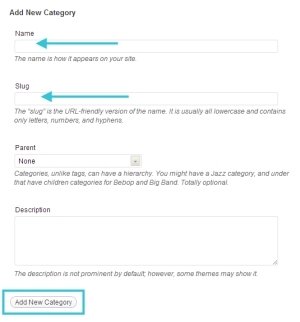
For the "Slug" type the address that will be category's link. For example "www.blog.webnode.com/blogging-tips" - it's slug will be "blogging-tips".
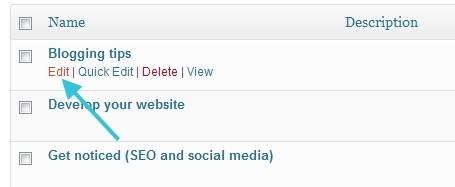
You can also modify the existing categories by hovering on them and clicking "Edit".
Images
To upload a new image click "Upload/Insert".
If you selected more than 1 picture, first click "Show" link on the right from image. You will see the following page:
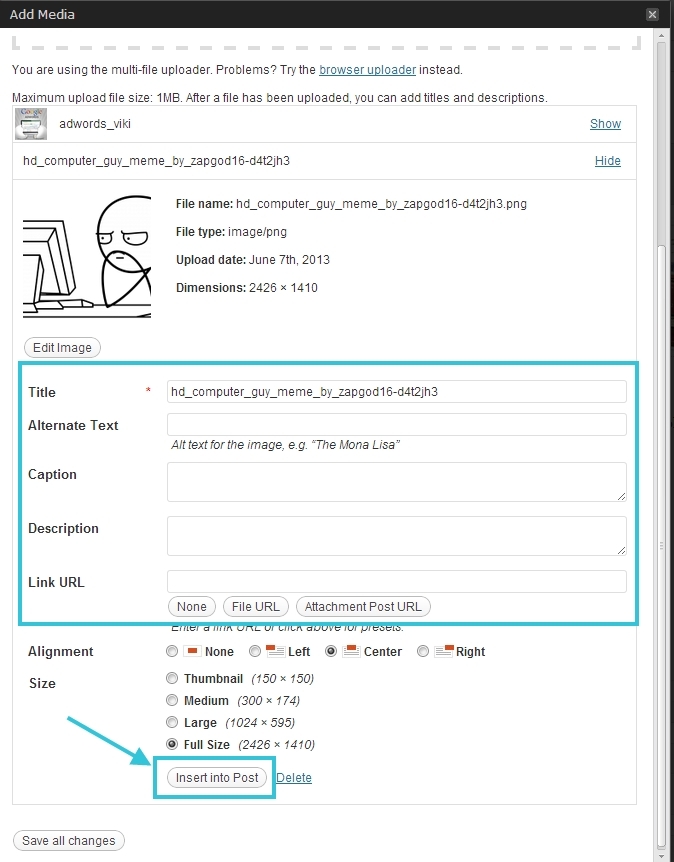
Make the necessary name editing of the image - read more about it here - and then click "Insert into Post".
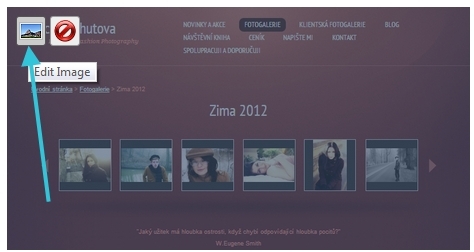
Later you can go back to editing image by hovering over it and clicking on properties icon:
In Advanced settings (1) you can adujst the size (2), but be careful so it's not smaller than 154x154 (3) otherwise the preview image on FB will be small. Also if the text is to close to the image you can insert horisantal or vertical spacing (4).
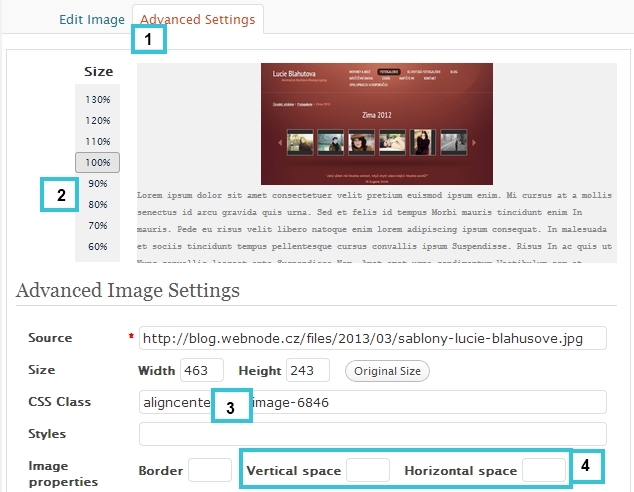
Also note! Sometimes you put "Center" in allignment of an image, but it's not going to center. Don't panic! Open properties again and put the image to the left, safe and close. Open again and put it back to center.